Sunday, July 8, 2012

Cooking: Mango to Baby Food


Hey there! I hope everyone had a great 4th of July! I thought I'd just pop on here real quick to let you know I haven't forgotten about blogging, its just been a bit of an adjustment and balancing act with working full time!(woo-hoo!) and having a pretty long commute. The good news is, even with all the time I DON'T have, I still have time to make Avery's food.

She's really into Mango. I don't know where she got that from, I don't think Andy has ever eaten plain mango, and I know I didn't pass on that taste to her!!! :-)
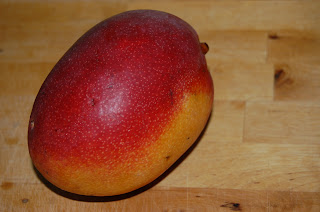


So I started with a pretty mango, pick the ones with the most yellow and red, the green ones need a little more ripening, I've tried bringing them home, and letting them ripen, but they never seemed to ripen at home. 


I dug out the fruit from around the pit, but I've since learned how to cut the fruit off around the pit, and then take the peel off.


You don't have to add any water or formula, the fruit is juicy enough, and when you thaw it, it does become a little thin anyway. So........


Just blend away! Make sure to let it go long enough that it's nice and smooth.


Next, to make it easy to pour into the ice trays, I first pour it into a sandwich bag, and to make sure I don't make a mess, I turn the top of the sandwich bag inside out, and prop it in a 2 cup measuring cup. 

Then just cut the tip, and pour into ice trays. 
Make sure it passes the Meeko test!


Then freeze, and once it's frozen, pop it into freezer bags, and make sure to label them.

Sunday, June 17, 2012

Crafting/Photography: Father's Day Present

Okay, so many of you know I'm an amateur photog. I love taking pictures, and of course, now my favorite subject is Avery. So naturally, the idea for a First Father's Day present came easy. A picture frame of Avery holding the letters to spell "DAD". It turned out great!


So the whole process took just a couple hours, and (don't tell Andy) cost less than $20. 2 letters - $6. The frame was on sale for $10, and I printed the photos out at Walgreens for about $1 each (5x7).

I went to Michael's and got one "D" and one "A" I thought about getting another "D" in a different font, but I liked how the same "D" would look on either side of the "A." You could do whatever you like! You could paint the letters, or use hodge podge and really decorate the letters, but I was running short on time, so I didn't even paint them! I just went with the white!

I knew I wanted to the white to pop out, so I had to think about where to position the baby, and how the lighting would work out. I had thoughts of having her on the lake front, with the skyline behind her, or with a brick wall behind her, or maybe sitting on our made bed, looking all cozy...but ultimately it ended up being super hot and humid out (scratch the lakefront) and overcast (lighting looked terrible in our bedroom - so scratch that) and when I tried in front of the brick wall, the "D" just didn't stand out enough. So option #4, I turned our black leather loveseat around to face the french doors. This way, she had a black background, and great lighting.

Then, it's just prop up the baby, give her the letters, and snap away! Not every picture is a winner, and after picking my favorites, I sent them thru Picasa, to increase the shadows, take out some of the detail from the couch. So it's just a short walk to Walgreens, a little assembly time, and there you have it. A Father's Day present, any dad could love.

Wednesday, June 6, 2012

Sewing: Black and White Brocade Tutorial


Okay, so getting back on track and getting settled in has been a little more crazy than I thought it would be, but I have been able to keep up with making more baby foods for Avery in different flavors, and starting to combine food - but that's another post!

I love this pattern for fabric, it's kind of a brochade-y fabric but I'm not bold enough to make curtains, or anything else with it, but I did make this darling little dress :-)

This pattern actually came on a handkerchief from Hobby Lobby, so I bought 2 to make a dress in the style of a pillowcase dress.


 So, first  I sewed both sides together, right sides together.


Then, I cut off 4 inches using a rotary cutter.


Then I marked 4 inches across and 4 inches down and used a dinner plate to make a nice circular pattern to cut out for the arms. I folded the fabric in half and only did one drawing and one cut so that the arm holes would match.


Then I folded over the edges and pressed with a hot iron. then roll over again and press again, before sewing. 

Also at this time, I took the top and did the same double fold over technique, but made the folds about 1 inch each.

Then sew one ribbon on each end of the top of the dress. Each ribbon should be about 6-7 inches long.


Then sew down the top, making sure to sew as close to the edge as possible to make room for the elastic. 


Now it's time to get the elastic in place. I put a safety pin thru one end of the elastic, then feed the elastic thru the top of the dress.  Then pull it tight, and sew off the other end off with an secure both ends with zigzag stitch. Cut off the excess with scissors.


Then just tie the ribbons in bows, the bottom was already hemmed, because I used the end of the handkerchief as that hem line :-)

 Grandma found this great little monogram pin, that I just added to it for a pop of color.


Wednesday, May 30, 2012

Questions Answered

Hello out there!
So life has been a little on the hectic/crazy side, with the holiday, and getting back to work, and getting ready for summer (yay!)

So I figured I'd take the time to answer some frequent questions I get.

Q: What kinds of baby food have you made?
A: All kinds! So far, I've done the following,(in order)
Avocados
Sweet Potatoes
Bananas
Apples
Squash
Pears
Peaches
Peas
Mango
Blueberry Pear
Ground Brown Rice

Q: How do you know what is good for the baby?
A: I read a lot! But I also realized I could just go to the baby food shelf of my local grocery store, and see what they have there! It's getting interesting now that baby is turning 6 months - All kinds of great combinations I can start playing with!

Q: Where do you find the time to make baby food??
A: It really doesn't take very long, usually a couple minutes to get the fruit/veggie on the steamer (if needed). Then maybe 10 minutes to puree, strain and pour the mixture into the freezer trays. The time in between when the food is steaming to when I can puree, I do the dishes, or make our meal, or feed baby.

Q: Where do you find the energy to do all this?
A: My husband Andy takes Avery over to a friend's house on Wednesdays, and sometimes on Saturday afternoons, so I have some time to focus on getting a sewing project done. The baby food, per the previous question just gets made on the fly, when I have a couple minutes.

Q: Why do you make your own baby food?
A: I like knowing what's going in Avery's mouth. I hate how many preservatives are in baby food, and the older she gets the scarier it gets (what exactly is in a "Chicken Dinner and vegetables?" (yikes). So I did some research, and found some recipes, and instructions on how to prepare baby food. An added bonus is that we are seeing some cost savings too by preparing her food at home and freezing it.

Q: How much money are you really saving?
A: Well, it depends. I think the best example so far is with the Mango I made. The cheapest I've found "NameBrand" Mango is $0.98 for 2 small containers of mango which holds approx 4 feedings total. I found Mango on sale for $1/lb at City Fresh Market. I bought a mango for $1.19. After making the mango (and I did not have to add water for it to puree - it has enough juices to do that on it's own) I ended up with 8 serving. So, what is that ? just under 80% savings? Not bad.

Another example - Pears. Now here once again "NameBrand" Pears $0.98 for 2 containers or approximately 4 feedings. I bought 1 can of pears on sale for $1.00. One can gave me about 7 servings, PLUS I saved and strained the juice to serve later as 1/2 juice and 1/2 water. Each can has about 1 cup (8oz) of juice. And each "NameBrand" concentrated juice comes in 4, 4 oz bottles for $3.59.

SO, if I dedicate $0.50 or $0.25 to the juice, and take 1/2 of of a "NameBrand" Juice pack - $1.79, or $0.89 a serving. So, I get about 70% savings.
And for the Pear baby food, I'm getting $0.14 per serving as opposed to $0.49 a serving. Not Bad. Especially since she's eating 4-5 times a day!


I hope this answers some of your questions! And keep them coming!  :-)

Tuesday, May 22, 2012

Cooking: Roasted Eggplant 2 Ways

Have you signed up to Follow Me by Email? If not, you could be missing posts from me! ----------->


Okay, so admittedly, I've never been a fan of eggplant, but there is a program in my neighborhood that gives out fresh produce, and I found myself with 2 of these things.

So, I figured I'll give it a shot. I googled some 5-star recipes and decided to keep it simple for this first shot.


First, peel the eggplant, I just used a veggie peeler, and tried to keep the skin pieces pretty big.


Next slice the eggplant in about 1/4 inch pieces.


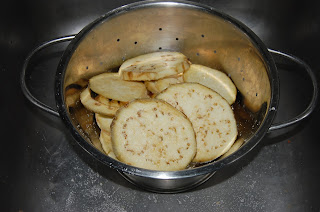
Generously salt both sides of the eggplant slices. Then set them in a collandar (or something like it) because the salt will pull out moisture from the eggplant. (which in turn makes them less spongy after cooked)


Wait 1 hour.

(I used the time to fry the eggplant skins, (see below) do some dishes, steamed some carrots for baby food, swept the floor, cleaned the counters, when I was done, it was about time to get back to it!)

To fry the skins, heat up some oil in a pan. I like to use this old cast iron skillet because, well, sometimes I burn things, and its easier to clean this pan than the other ones if I burn something! :-)

You'll know the oil is hot and ready when you sprinkle just a little water in the oil and it makes a "popping" sound. 
Toss, okay, well, gently place the skins in the oil. Let them sit for maybe 20-30 seconds, then turn over with tongs. Take them out and place on paper towels to soak up the extra oil.


Now you have crispy eggplant chips. You can lightly salt them if you want, or just eat them as is!


Okay, now back to the meaty eggplant slices, take them out of the collander, and place them on paper towels. Lightly press down on them so as to get as much moisture out of them with out smushing them.


Salt, pepper, and sprinkle with garlic, place on a lightly greased pan, and bake in the oven. I think I did 350 for 20-30 minutes. (my oven runs hot, so you'll want to keep an eye on yours)


And now you have roasted eggplant, and crispy eggplant chips! Enjoy!


Wednesday, May 16, 2012

Cooking: Canned Fruit to Baby Food


Okay, So since I started making baby food, I've gotten a lot of questions about it. Doesn't it take a lot of time? Isn't it expensive? Doesn't it take a lot of equipment? So I decided to do a little tutorial about how I turned this canned fruit ($1 on sale) into baby food.


First start with fruit in 100% juice. Not the heavy syrup. 
I drained off the juice and saved it to freeze so next month, I can start giving Avery diluted fruit juice. (Must be the Dutch in me trying to use/save everything I can :-)


Then throw it in the blender. As for time, I did this while I was preparing spaghetti and held back a couple pear halves for my Husband and me. So as far as how long it takes to prepare, so far, no time at all.

Then puree! You can use a high-speed blender like mine, or you can use a food processor, or one of those special baby food makers, but whatever you have on hand would work.

Make sure it's a nice and smooth consistancy.

Portion out the pureed pears into your freezer trays or ice trays. You could also put these in sterallized glass jars.


As always - Fruit must pass the "Meeko Test." Our silly cat loves fruit!

Wrap it up in tinfoil.

Throw it in the freezer, and a few hours later, you've got frozen baby food. Make sure to suck out the extra air, label the date and what it is on the outside, and store away! They should be good for about 2 months in the freezer. Avery is now taking about 3 of these each feeding, so we'll be thru these in no time!

Wednesday, May 9, 2012

Crafting: Stringing Pearls

So, a little off the beaten path, but I saw these beads at Michael's for $0.99 each! I started seeing portraits of Avery with little beads, and big beads, and oh- my! Little strings of glass pearls for playing dress up! Too cute! So I did some research to see how I would go about stringing a necklace of pearl (glass) beads. In this tutorial I used beading thread, but I've also used silk thread from the sewing department as well, and to be honest, I really liked using the silk better, just sayin'. :-)

What you need:
Beads - each of these strings is 12 inches, so the necklace will end up being about 24"
Some form of closure - this is going to really be whatever you prefer
Flexible beading needles - I usually end up using a couple thru this process
Thread - As I mentioned, I actually prefer to use the silk as opposed to what is pictured.
Scissors - whatever is handy


 Step One - find a surface that will not allow the beads to roll all over - I used a piece of felt. Then cut a length of thread that's at least 4 times the length of your finished necklace, so 4 times the 24" for my necklace below.

Step Two - thread your needle - you'll want to leave a pretty long tail on it, because the eye collapses once you pull on it a little.


Step Three - Release the Beads! No seriously, be careful when you make the cut that the beads don't shoot off the end.


Step Four, Now, start threading the beads on your thread. Leave a good 8 inches or so open on the end of your thread.


Step Five, thread on 1/2 of your closure.


Step Six - loop the thread back thru the last bead.


Step Seven - make a knot.


Step Eight - tighten the knot down as tight as you can.


 Step Nine - Thread the needle thru the next bead and tie another knot. Repeat, repeat, repeat, repeat ( you get the picture)


Step Ten - Thread on the second half of your closure.


Step Eleven - Thread both of the thread tails back thru the first bead.


Step Twelve - Make a knot. Do this again at least 3 times.


Last Step - Cut the thread! You're all done!