Don't forget to Follow Me by Email ! --------------------------------------------------------------------->
I love this soft and silky lovey - I would have loved to have one when I was a little girl. It's so cozy, but so soft! I want one my size!!
I used a free project pattern from Joann's but reversed the colors. It took a little manuevering to get the puffy strips just right, and I'm wondering why I didn't just use my ruffle foot, but maybe next time I make it I'll have a little more confidence in playing around with the style. :-)
I loved working with the flannel backed satin. I've used regular satin in a couple different projects, and I don't think I'll be going back to the regular satin!
I am so glad I took the time to finish it with a whip-stitch to finish the edges - I was
tempted to just use the sewing machine zig-zag foot, but took the time
to hand sew the edge and I can't be happier with how it turned out :-)
And finally it was a perfect day out to take Avery to the park to play and listen to the birds for a while.
If you think those hair accessories are familiar - that's cause you can see them here and here! Comments are always welcome :-)
Kate
Wednesday, April 25, 2012
Monday, April 23, 2012
Cooking: Game Changing Guacamole
I call this Game Changing Guacamole because my Dad, while we were in Mexico, refused to eat Guacamole. He swore it was horrible stuff, he had no interest in eating it ever. Well, my husband and I convinced him, kicking and screaming to try one bite. And he's been hooked ever since! :-) Let's get started (my mouth is watering just thinking about this guacamole!)
Starting with the Avocados. I pick Avocados that just barely give when you lightly squeeze. I've noticed most grocery stores have started puting "Ripe" stickers on the ones they think are ready. Mostly I've found that those are over ripe, and have brown spots upon opening them. :-(
I halve then score the Avocado in order to make mashing a little easier. Then use a spoon to scoop out all the yummy greenness that is inside. Mash and then either cut a lemon and use half of the lemon, or just use the lemon juice squeeze guy. Don't put the lemon away yet, you might need the other half! I find some lemons have lots of "lemmonness" and some don't have quite as much as I'd like.
Garlic! So much garlic! I used 4 cloves and minced the bits nice and tiny.
Red onion joins the party next - I like using the red onion because it has a bit of sweetness in it. I'm sure you could use whatever onion you have. 1/2 of an onion.(I wonder how Vadalia onions would fare in this? I guess next time I get some in I'll have to try that!)
Cilantro, a good half of a bunch of cilantro. I try to use as much of just the leaves as I can and only use the top half of the stalks, they seem to get too woody after about where the band is. So I just pull the leaves off the woody stalks and chop them up. Once again, don't put it away, you might want to add some after tasting it all together.
Now to add the heat! I'm a wuss. I use 1 small serrano pepper. Without the seeds, thank you very much. :-)
Make sure not to touch your face after handling this guy - some people recommend using rubber gloves, or other such things. I just make sure to wash my hands VERY well after. Dice him to tiny bits.
Mix, and mix. Taste. Add Salt, and whatever else you might deem to be missing. For this batch, I ended up using the full lemon, and about 1 tsp of salt. And of course, it was gone before you could say Guacamole is Ready!
What you'll need:
2-3 Avocados
1 lemon or 1tbls lemon juice
4-5 cloves of garlic
1/2 red onion
1/2 bunch of cilantro
1 serrano pepper
1 tsp salt
Tortilla chips, or the husband's Steak Tacos! mmmmm. Enjoy!
Friday, April 20, 2012
Craft: Felt Flower Hair Clips
Have you clicked on the Follow Me yet? Do it now! :-) ----------------------------------------------->
So now with all these new dresses, Little Girl needs some new accesories! I saw this tutorial for how to make felt flower hair clips, and couldn't resist! I used hair clips left over from making the flower hair bows, a couple dabs of hot glue and half a sheet of felt ($0.29) at Michaels.
The original tutorial called for just 4 peices of felt glued together, just like the light pink flower, but I thought why not get some more color in there??? So for the next one, I cut 4 pieces of hot pink and 4 pieces of light pink and glued them together first, then followed the instructions to piece it together. It took a little more glue and a little more holding it into place, but I'm really digging the results!
Enough so that I thought, Why stop here? So I made one to go with the Purple Bandana Dress.
For the headbands, the only fold-over-elastic I could find was on-line. And I am too impatient to wait! But while at Hobby Lobby, a couple weeks ago, I found this elastic lace. Its as simple as cutting a couple pieces to length, then hot-glueing the ends together to make the headbands. I think, in this picture they look a little like garter belts, but they are actually really cute on her head!
Hopefully, we can get a nice sun-shiny day soon and I can add some pictures of Avery in her new dresses and accessories!!
Labels:
baby,
craft,
crafting,
crafty,
creating,
easy,
easy project,
flower,
hair accessories,
nesting,
project,
quick,
recycling,
sewing,
upcycling
Wednesday, April 18, 2012
Sewing: Purple Bandana Easy Dress
I've seen different variations of this dress, and thought I'd give it a try. Boy was it easy! I think it may have taken about 30 minutes to complete! Wow, and $2.50 maybe $3.00 total?
Hankerchiefs come in so many different colors now, and this piece can be worn so many ways! Bow in the front, Bow in the back, leave off the ribbon and it's a skirt, use it as a cover-up from the sun on the beach, you name it!
The great part is, you don't have to use hankerchiefs to do this! you can use any square or rectangle fabric, as long as you have enough of it!
1. First, cut the hankerchiefs so they make a rectangle,
2. Then sew the sides together.
3. Fold over the top to make room for the elastic,
4. Sew on the ribbon,
5. Then hem it .
Tuesday, April 17, 2012
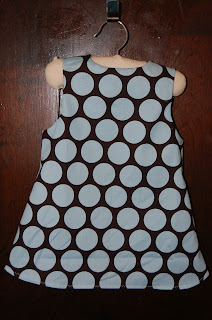
Sewing: Blue and Brown Easy Dress
Apparently I'm stuck on shades of Brown currently!
I LOVE this fabric I picked up at Hobby Lobby on clearance :-)
I used the same pattern from Daddy's Upscycled Dress but left the buttons as functional, instead of having the back button up.
It turned out so pretty, and I'm seriously in love with the dots! The pattern called for appliques to be added, but I don't think I can add anything to this!
Start to finish it took about 1 1/2 hrs. (you know, in between steaming veggies and changing diapers!) And unfortunately my model was asleep when I finished, so I don't have a picture of her in it yet, but I'll add it once I get a chance to get her in it!
This was so easy, I almost want to make a ton of them in different fabrics! But I will work on tackling other patterns. :-)
Labels:
baby,
easy,
easy project,
gift ideas,
home made,
homemade,
nesting,
quick,
sewing
Saturday, April 14, 2012
Cooking: Sweet Potato Baby Food
So after some sticker shock in looking at baby food prices, I decided to give making baby food at home a try. So this is my adventure in making a Sweet Potato into small frozen bubbles per the Super Baby Food method. First is cutting the sweet potato into chunks. No need to skin it, the skin will come off easily once it's cooked. Then throwing it into a double boiler/Steamer for 40 minutes or until they are nice and tender. (make sure to have enough water in the pot - we found out the hard way about that :-( )
Next comes the puree-ing! Peel off the skins before throwing them in whatever device you've got to puree them. Add a little bit of formula or breast milk so it can puree smoothly. I'm not sure how much...it's going to be just enough so your blender/food processor needs to get the baby food smooth.
Then puree! My it's easiest to start off with a little pulsing, then let 'er rip!
Because I'm being a little extra cautious, I then strained the mixture. It really didn't take as long as I thought it would to strain, so I definately will be doing that again! Then it's just a matter of dishing the puree into freezer safe storage. I found these nifty ice cube trays that pop out once their frozen, and they are a perfect size for a certain baby girl I know who will begin eating soon!
This freezer bag is one full sweet potato! Lots of little tiny meals, for a tiny little mouth!
Thursday, April 12, 2012
Sewing:Upcycling Daddy's Shirt into a Dress
So a bit of a detour tonight, I had all these things I was going to do tonight (including go to sleep early!) But it all got scrapped when the Hubby decided his silver shirt was done for. I really liked the color of it, a nice silver with a little sheen to it, and I wondered if there was enough fabric to make a simple dress out of it.
Turns out the answer is YES! So I started with a men's XLT shirt,
and ended up with this:
I used Simplicity Pattern 0150 . The front felt a little plain, so I added the bows with fabric that came from the sleeves.
The front of the shirt is the back of the dress. The back of the dress is the front of the shirt.
I left the back as functional buttons, so I once again, wouldn't have to make my own button holes. (I've really got to get over my fear of making button holes!!)
All in all it was a really easy project, it took about 1 1/2 hrs or so. And I saved some time because I used the bottom of the shirt as the bottom hem!
I also sewed the back button pleat shut from the 3rd button down. No need in having the entire dress come apart! Although, maybe in the future I could leave the buttons as the front of the dress, and....oh the possibilities!!
Turns out the answer is YES! So I started with a men's XLT shirt,
and ended up with this:
I used Simplicity Pattern 0150 . The front felt a little plain, so I added the bows with fabric that came from the sleeves.
The front of the shirt is the back of the dress. The back of the dress is the front of the shirt.
I left the back as functional buttons, so I once again, wouldn't have to make my own button holes. (I've really got to get over my fear of making button holes!!)
All in all it was a really easy project, it took about 1 1/2 hrs or so. And I saved some time because I used the bottom of the shirt as the bottom hem!
The original pattern calls for an applique to be put on the dress in a couple different locations, but for this fabric, I liked the simple-ness of just some added bows.
I made this in a bit of a larger size, so Avery doesn't fit in it right now, but I can't wait to see her in it!
Labels:
baby,
craft,
crafting,
creating,
easy,
easy project,
gift,
gift ideas,
homemade,
nesting,
project,
quick,
recycling,
sewing,
upcycling
Tuesday, April 10, 2012
Sewing: Matching Mary Jane Shoes for Avery's Dress
So if you've been following me, you know for Easter, I made my little girl, Avery a beautiful dress and everyone knows with a beautiful dress, you have to have the PERFECT shoes to go with it. (nevermind that she's 4 months old and wants nothing in between her mouth and her toes!
So here they are! I took a pattern I originally found here because they looked simple enough! I knew I wanted the elastic to be the same ribbon from the back of the Ribbon Back Dress.
It did take a couple tries of laying out the fabric and cutting and sewing to make sure everything came together.
I ended up running out of time, so I used snaps on the inside of the ribbon instead of button holes. and to finish off the ribbon ends, I just took my trusty hot glue gun to the ends of a small cut piece of ribbon.
Then folded it over and around the longer piece of ribbon.
I love how they turned out (although I see in the pictures there's a loose thread I should have removed!) and of course, as soon as we were done taking these pictures, they were forgotten.
Maybe more shoes will be in her future??? Follow me and see ! :-)
Labels:
baby,
craft,
crafting,
creating,
easy project,
gift ideas,
homemade,
nesting,
project,
quick,
sewing
Monday, April 9, 2012
Cooking: Pancetta, Mushrooms and Pea Pasta
I love this pasta! The original recipe is from Food Network, but I've since made modifications. I always seem to forget how much I love it, until something reminds me. This time, while making the bacon for the Bacon Cream Cheese stuffed Pastries, I thought, I have GOT to make this pasta for ME! (Hubby doesn't like peas or mushrooms) So I did!
Depending on how lazy I'm feeling, I'll use thick-cut bacon instead of the pancetta and start by frying it up (or baking) until crispy. Drain, set aside, and in goes some mushrooms. Once they are tender, the tomato sauce joins the party. I used to use the can-o-tomatoes to make my own sauce, but this time just used a jar of Prego because it was what was on hand! The bacon gets re-introduced to the pan, the pasta (I used mini farfarelles) and the FROZEN peas go in. Do not use canned peas, they'll loose their crispness!
Because Hubby doesn't enjoy this nearly enough (he'll eat it, it's just not his favorite) I make up a nice bowl for myself, then portion out the rest for lunches at work! I like to re-freeze the portions, because then when I zap them in the microwave, the peas are crisp again! Magic! :-)
Wednesday, April 4, 2012
Sewing: Ribbon Back Dress
I am SEW freaking excited about this little dress I made tonight!! I know that the pictures will be better if I wait until tomorrow to take the pictures, But I'm so freaking excited!! :-)
I found this fabric at Hobby Lobby on clearance for $3/yard, so of course I bought one yard! I am in love with the muted tones, and love how the print looks like either flowers or butterflies!
So I didn't use a pattern (don't tell my Aunt Sharon!) I just used a dress from Avery's closet, and made some modifications.
It started off as a jumper, with function buttons on the top of the sleeves, but my button-footer for my sewing machine is lost in a silver tin in the bottom of our Christmas tub in storage. I know, I need to go dig it out, but that's not as much fun as working on projects!
Any-hoo - so after an impromptu fitting, I saw that the middle was a little tight, so after consulting with my Hubby, he suggested I put buttons down the back, to add just a little wiggle room. So it's not perfect, but it is my first attempt at a dress.
So her are some detail shots - I loosened my tension on the bobbin while doing the top-stitching and got this great wavy-pattern.
And of course, I finished the back with the same Victorian Lilac ribbon from our wedding (I told you I had a lot of ribbon left!)
I can definitely see doing dresses in the future!Now to make the matching headband and shoes to go with it :-)
Subscribe to:
Posts (Atom)